St. Patrick’s Day Activities with FamilyFun

St. Patrick’s Day Activities with FamilyFun Mom’s Lifesavers
Mom’s Lifesavers is as happy as a leprechaun with a pot of gold to share these St. Patrick’s Day activities from our friends at FamilyFun.
FamilyFun ’s Shamrock Smoothie offers a healthy twist on a family favorite drink and one that is packed with nearly 100 percent of your daily vitamin C.
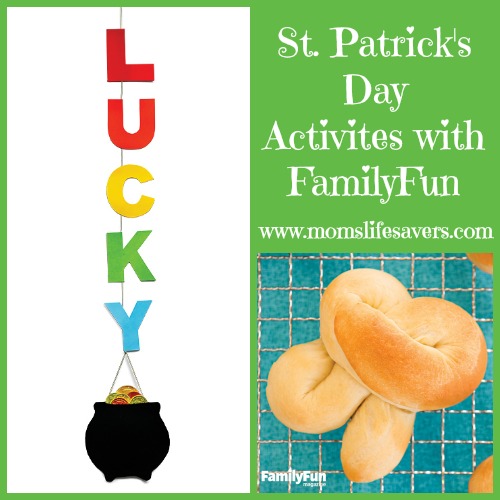
Another great recipe that the kids will love helping with are FamilyFun’s Shamrockin’ Rolls. This hands on recipe will be enjoyed by the whole family.
Don’t forget to have your child hang their Lucky Charm banner (pictured above) on their door on March 16th. Legend has it that leprechauns may leave gold coins in the pot during the night.
Photo Credits: FamilyFun Magazine
Shamrock Smoothie
This festive St. Patrick’s Day treat offers nearly 100 percent of your daily vitamin C.*
Directions: Combine a large banana (peeled, sliced, and frozen), 2 cups honeydew melon chunks, 2 kiwifruits (peeled and cut into chunks), 1 cup frozen vanilla yogurt, and 1/4 cup tightly packed parsley leaves in a blender and puree them until smooth. Serve immediately. Makes 4 cups.
*In addition to being a powerful antioxidant, vitamin C helps the body heal cuts and wounds.
Shamrockin’ Rolls
These rolls require a little planning to allow the dough to rise. Active time: 50 minutes Total time: 3 hours 45 minutes (includes rising) Makes: 12 rolls
Ingredients
- 3 ½ cups flour
- ¼ cup sugar
- 1 packet rapid rise yeast
- ¾ cups milk, warmed to 110-115 degrees
- 6 tablespoons unsalted butter, melted and cooled, plus 4 tablespoons, melted for brushing
- 2 eggs, at room temperature
Directions
- In a large bowl, whisk together the first four ingredients. In a medium bowl, whisk together the remaining three. Combine the two mixtures and stir until well blended.
- On a lightly floured surface, knead the dough for about 10 minutes. Add a little flour if the dough is sticky. Place it in an oiled bowl and turn to coat. Cover the bowl with a damp towel and let the dough rise until doubled in size, about 1 1/2 hours.
- Line two baking sheets with parchment paper. Punch down the dough and knead it for a few minutes to release the gas bubbles. Halve the dough; return one portion to the bowl and cover. On a lightly floured surface, roll out the other half into a 4 1/2- by 8-inch rectangle.
- Cut the dough rectangle lengthwise into six 3/4-inch strips. Cover them with plastic wrap. On a clean surface and working with one at a time, roll and stretch a strip into a 19-inch-long rope. Form a shamrock as shown in diagram, then place it on the baking sheet and cover it with plastic wrap. Repeat with the remaining dough, placing six rolls on each baking sheet and spacing them 2 inches apart. Let the dough rise for 45 minutes.
- Heat the oven to 350 degrees. Brush the rolls with melted butter. Bake, switching each pan’s position halfway through, until the rolls are golden brown, about 25 minutes. Let them cool slightly on a rack before serving.
Kids can … Measure and mix the dough • Shape the rolls • Brush the rolls with butter
Lucky Charm Banner
Legend has it that if a child hangs this banner from his door on March 16, leprechauns may leave gold coins in the pot during the night.
- Cut two of each of the letters in the word lucky from colored paper. (Ours are 3 inches high.)
- Sandwich the matching letters around a length of string and secure them with a glue stick. Leave a couple of feet of excess string at each end of the banner.
- Cut two matching pot shapes from black felt. Glue the shapes together along the sides and bottom. Let the glue dry.
- Using the string at the banner’s bottom and a tapestry needle, stitch across one layer of the pot’s opening. Tie the end of the string to itself just below the letter Y, as shown. Tie a loop in the string above the L for hanging.
Follow FamilyFun on Facebook for more great family friendly activities year round.


Leave a Reply