
Hurricane Vase Project from our Trip to the Ocean
Cover a store bought vase with your beach collection!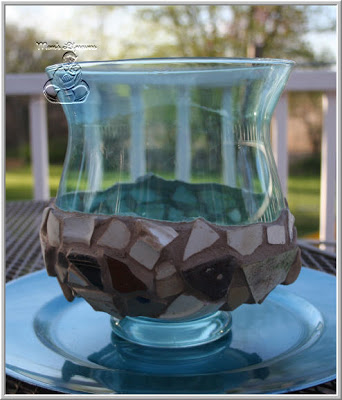

This collection of pottery shards were gathered by my husband and I during a weekend stay at Peak Island, ME. We were in search of beach glass – well at least I was, hubby was a good sport though and did quite a bit of collecting – we can be pretty competitive! I was surprised to find pottery and lots of it!
I couldn’t believe all of the gorgeous pieces of pottery along the shore line – floral patterns were a special find! Each little piece was like treasure to me. Now back to the project!
- Gather your supplies:
- Your collection – mosaic pieces, colored glass, scrabble tiles, beach glass, shells, – what ever suits your fancy!
- Double sided tape
- Grout – I used some that we had left over from tiling our basement (just add water!) TIP – there is also premixed which is even easier to use – just open the container!
- Store bought glass container – I found mine at The Christmas Tree Shops
- Covered work area

Directions:
- Apply double sided tape to back of your individual pieces and adhere them to your clean and dry container.
- Once all your pieces are in place, mix up your grout according to the package instructions – the kind I used only required water.
- Mix the grout so that it is thick enough to not ‘run’ down the container you are using – not quite as thick as cookie dough but not as thin as cake batter (can you tell I’m hungry?)
- Apply the grout over your ‘collection’ covering the pieces almost or completely – you want to use the grout as the agent to hold the pieces in place, filling in all around the pieces.
- Remove any excess grout once you have everything covered – the grout should be even with the pieces now, not covering it
- The grout will set pretty quickly – as it starts to harden, use a damp cloth and wipe away any grout ‘haze’ so that your piece are clean – TIP – Use an old tooth brush to get into any cracks/grooves
- Let it dry overnight
- Enjoy!
TIP – Add a charger plate underneath the finished piece and add any ‘extra’ pieces you have to display!
Like us on Facebook!


Leave a Reply